Blog

Indesit Washing machine
Blog

Indesit Washing machine: How To Use?

Using a washing machine can go a bit technical as you dynamically change your brands. In the world of domestic appliances, we get to see Indesit building a lot with tech, quality, and affordability. 

Indesit started their journey in 1975 as an Italian company and then they became one of the leading European manufacturers. Right now, they are the undisputed leader in the major domestic appliances market. Countries like Italy, Russia, and the UK are the ‘real’ consumers for this Fabriano-based company.

About their washing machines, they have simply maximized sales due to the quality and values they’ve added. Indesit is getting international market coverage now and you can get their washing machines repaired in Dubai, too.

Here’s an easy gateway to using Washing Machine:

Using Indesit Washing Machine – A Practical Guide!

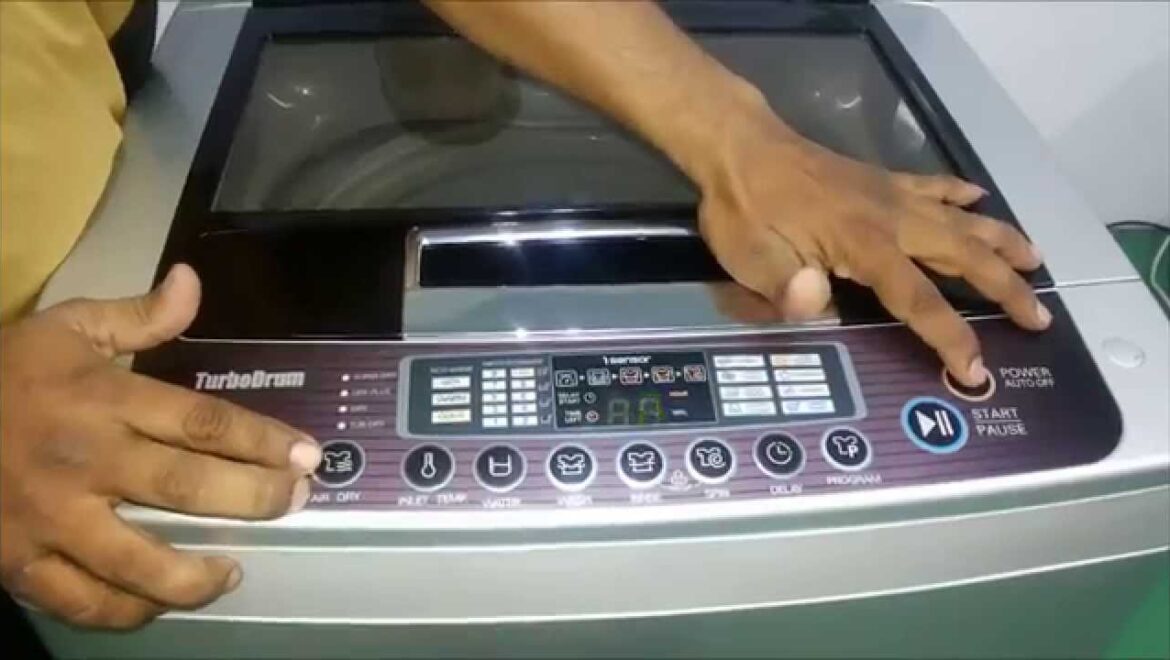
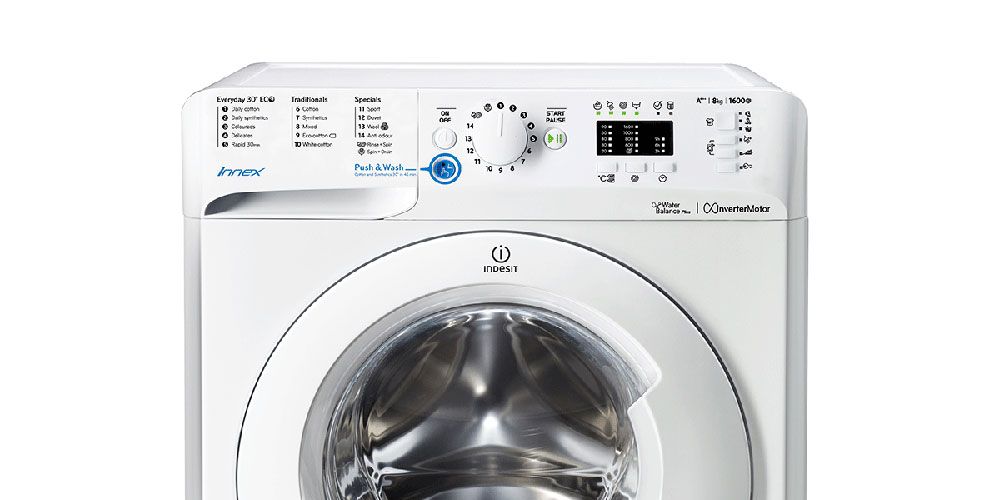
The above figure showcases how the Indesit washing machines interface actually looks. Here:

“A” stands for Programme Selector:

Using this dial, you can customize and select the washing style from the 15 washing programs available. Make sure you turn this dial in a clockwise direction and only when the appliance is switched off.

“B” stands for Temperature Selector:

After the program selector, we have the wash temperature program. You can reduce or elevate wash temperature according to the cloth types.

“C” stands for the Detergent Dispenser:

Next, we have a detergent dispenser that features three compartments labeled as:

  1. Prewash detergent
  2. Wash detergent
  3. Fabric Softener

“D” Stands for ON-OFF button

This button is similar to that on your e-boards. Pressing the button turns on the washer while depressing the button turns off the washer.

“E” stands for slow spin button

Using this button greatly reduces the spinning speed from 1200 to 600 rpm for the cotton and linen programs. Additionally, you can customize the button speed in comparison to the synthetic fabric programs.

“F” stands for Rinse Hold Button

This button stops delicate or synthetic fabrics from creasing. It can be used with customized programs, too including woolens and synthetic fibers.

That’s all about the interface. The last button “G” is for the ON/OFF indicator light!

Starting Up Your Indesit Washing Machine – 3 Steps to Follow

Step #1. Turn it ON

The first step is to run the washer without laundry by using any program. Make sure you go with the 90°C temperature.

Step #2. Load the laundry

Next, you have to load your laundry in the washer. You can add some fabric softener or detergent at this moment as it will get mixed within and help you get freshness faster.

Make sure you:

  • Shut the door properly
  • Plug the washer in at the mains
  • Turn on the washer supply
  • Check that button D isn’t pressed across (It is labeled as “O”)

Step #3. Select the Programme and get easy cleanliness

Next, you have to select a program that suits your clothes and laundry. The above labels including A, B, E, and F can help you choose one. Lastly, as you turn off the washer, wait for 3-5 minutes before opening the door.

The Bottom Line

That’s it, this is how the Indesit washing machine works. The company has created a wonderful interface that is very effective and easy to use. If you encounter working issues with your washing machine, try out washing machine repair Dubai.

TIPS FOR KEEPING YOUR WASHING MACHINE WORKING PERFECTLY
Blog

Tips for keeping your Washing Machine Working Perfectly

Getting your washing machine repaired every month is like a nightmare for everybody around.

Isn’t that right?

However, with just a few tweaks, you can get your washing machine working perfectly. These tweaks (measures) may include some experts’ advice and a bit of technical knowledge.

A broken washer, low-performance machinery, or a non-working fan is going to crack your style, clothes, and dry out your savings, too.

With no further details, let’s get straight to the point and save yourselves with the easy maintenance for your washing machine:

Tip #1. Clean your Washer

First things first, clean your washer regularly to avoid residue and clogs. Make sure you find some time to get it cleaned every week or so. Otherwise, the residue and clogs make it difficult to keep it working smoothly.

Here is a simple strategy to do it:

  • Start your washing with load program and hot water
  • Mix 3 cups of vinegar and a half cup of baking soda
  • Wait for a few minutes to get them mixed and take action across
  • As the clogs get dissolved, use a sponge to wipe the washing machine

If the clogs are hard ones, you can go for two more cycles, too

Tip #2. Load Clothing Evenly

After regular cleaning, loading clothes evenly is something that can keep you washing machine in position. Make sure you load your clothes evenly on all sides of standard washers. If your washing machine does have a central agitator, place clothing evenly around.

Additionally, consider the weight of clothes while loading. For rough clothing including jackets or jeans, go for an even spread so that their weight is divided equally to keep the washer moving.

Tip #3. Avoid Overloading

Next, we have the overloading factor. There can be some urgency situations where you opt for an overload but overloading puts additional pressure on the washer causing washer parts to exhaust and put an imbalance within the machinery.

To learn about the maximum quantity, you can check your washing machine’s manual. Stick to the washer’s quota and help your washing machine work seamlessly!


Tip #4. Wipe the Fabric Softener and Detergent Compartments Periodically

In your washing machine, the detergent drawer makes it easy for you to measure the suitable quantity required. However, if it goes for quite long, the residue can clog up and leave you with no space for the fresh detergent.

A similar issue can arise with fabric softener compartments, too. Any build-up in the fabric or detergent compartment can cause leakage. To avoid that, you should practice cleaning these compartments and remove the residue by putting some water in the compartment.

The Bottom Line

All these measures can surely make your washing machine working perfectly. From the first practice to the least one, you have to take proper care to avoid the repairing costs.

 However, if the washer dries out or the machinery doesn’t work fine, you can opt for Washing Machine Repair Dubai as they are actually the pioneers of their scope!

How to Clean Washing Machine
Blog

How to Clean Washing Machine

Whatever domestic appliances we use, we require some precise care to make them work effectively. And when it comes to washing machines which directly stands for removing dirt and stains, we have to ensure cleanliness at its edge!

If you ever get to see sulfur or a whiff of rotten eggs while moving your laundry to your newly-purchased dryer, your dirty washing machine is the reason behind. Cleaning your washing machines is what laundry experts suggest and you should make it once a month to have the finest results around.

If the washing machine goes out of order and doesn’t perform well, Go for Washing Machine Repair Dubai. 

Clean Your Washing Machine – 5 Steps to Take!

Ready to clean your washing machine? Here are the five most effective steps to get started;

make sure you follow each of them and then look at how your washer performs:

Step #1. HOT Water is your friend

Start your cleaning process by making your washer perform on hot water with the largest load setting (the fastest one). No need to add clothes but make sure you add 3-4 cups of white vinegar (must be of top-notch quality) and wait for a few minutes to make sure the vinegar is mixed within.

Step #2. Add some Baking soda

As you have mixed vinegar and hot water, its time to unleash the power of baking soda. Run the machine for a few minutes (not more than 5 minutes) and add baking soda.

As baking soda gets mixed effectively, stop the washer, and allow the content to sit for half an hour. For better results, you can go for an hour to stop straight (it is recommended only if the washer is extra-dirty).

Step #3. Cleaning Starts Now!

As the hot water, vinegar and baking soda are taking measures to penetrate the odors and grime, use a clean cloth dipped in the vinegar water to actually clean the washer. Clean effectively and put some fine attention to the top of the washer, wash bin, the knobs, and other dirt patches.

Step #4. Drain The Water

Next, we have to drain while spinning. As the washer spins, the dirt and mixed content will start to flow. If you find any difficulty within, you can start another hot wash cycle and drain the dirt particles completely.

Step #5. Finalize with the SCUM

Lastly, you might be left with the scum around the top of the washer. That scum can be easily carried out with the help of a sponge. Taking an extra-threaded sponge is gonna solve your problem instantly. To avoid scratches, you can add a few splashes of water and finalize the cleaning process!

The Bottom Line

No matter how long it takes but the above 5-step formula is what that expert recommends. Cleaning the washing machine is something you should do once or twice a month. If you find it difficult to clean it yourselves, opt-for a repair/cleaning shop to have instant and quality output.

How to Use Automatic Washing Machine
Blog

How to Use Automatic Washing Machine

On your journey towards extra clean clothing, you have to master the equipment you use. When it comes to automatic washing machines which are the most convenient equipment of its sort, a dedicated manual or guide is required to have the best results.

The automatic washing machines tech was introduced earlier in 1937 by Bendix Home and it was liked by everyone. Later, several domestic appliances companies invested in creating an automatic setup that works on the plug-and-play interface.

How to Use Automatic Washing Machine?

Before we move over to the step-by-step guide to automatic washing, let’s talk about the two types of automatic washing machines available:

Type #1. Top Load Washing Machine

The top load washing machine stands for a typical washer and is used widely for domestic purposes. The tech is a bit old yet it is getting better with additional features like the temperature control and dryer facility.

Type #2. Front Load Washing Machine

Regarding the front load equipment, it is mostly used for commercial purposes. The only difference between the top-load and front-load washing machine is the procedure that makes them work. Front-loaders are recommended for extra dirt as you have the speed, cycle, and temperature options just a click away. Due to the features mentioned above, it becomes advantageous for professionals and we find them in every dry cleaner’s shop.

Using Top Load Washing Machine – 4 Steps to Get your laundry cleaned!

Here is a step-by-step guide to using a top load washing machine:


  • Find a suitable detergent: Firstly, choose the right detergent that is suitable for the nature of the clothes you’re putting in. As you find one, place it in the laundry dispenser/empty drum.
  • Add your clothes: Next, add clothes but ensure there is enough space at the top so that you can grab the clothes easily.
  • Select the cycle: Here comes the ‘actual’ decision; decide the cycle speed according to your fabric level. Pick the one that is right for your load.
  • Unload the laundry: As the cycle ends, immediately unload your laundry to ensure your clothes’ freshness.


Using a Front Load Washing Machine

Let’s talk about using a front-load washing machine which requires less time as compared the top-loads:


  • Dose Correctly: Start your washing process by following the measures on the packaging of your detergent. That dose is going to decide how much detergent will cover the dirtiness and owe your clothes a fresh look.
  • Load the laundry: Open the stylish door and place your clothes within. You have to make sure that you’re not overfilling the machine. You can check that by putting one hand in and if the palm doesn’t fit, try removing some of the laundries.
  • Choose temperature and the spin cycle: Next, you have to decide the temperature and the spin cycle depending on your fabric quality and details.
  • Start the Washing Process: After you’re done with temperature and spin cycle, press the ‘go’ button and get them washed effectively. As the cycle gets completed, unload clothes and go with the drying process.


The Bottom Line

That’s all about automatic washing machines, all you need is to focus on the detergent you use and take care of your the garments load to have the maximum output around. And yes, if your washing machine goes out of order, opt for Washing Machine Repair Dubai as they are the best in the market!

Samsung TV Service Center Dubai
Blog

Samsung TV Service Center Dubai

Samsung is one of the top electronic brands. In South Korea, it has headquartered and was launched in 1938. Many electronic products are manufactured under their leading instructions, and most of them we use in our daily lives. 

Ranging from mobile phones to gadgets, printers, refrigerators, washing machines, TV, air conditioners, etc., all products of Samsung are world-famous.

When it comes to the entertainment factor, Samsung Televisions are the most demanding among TV viewers around the whole world. It is just because of its supreme quality. You can have TV sets of all sizes and budget range that suits you.

Just like a man is a puppet of mistakes, all human-made products have some errors to some extent. Similar to other popular TV brands, Samsung televisions also appear with several defects in terms of functionality. You may encounter discolored pictures, poor sound quality, error in the contrast settings, and lots more. These are all common problems that come onto the surface of different TV models of Samsung.

An only experienced person can deal with these issues without damaging the products even more. Repairshopdubai is the best option when it comes to finding the best TV repair Dubai. We have all the best group of experts who can fix any kind of issue with reasonable and affordable Samsung TV service center Dubai.

Do you know how many service centers does Samsung have?

Whether it is product repairing or just some help, Samsung has more than 3000 service branches in only India. Samsung branches in all over the world are fully enriched with skilled and trained people. 

Users of Samsung TV most likely complain about the following errors:

Undoubtedly, Samsung TVs have higher quality in combination with advanced features. Still, they are unable to provide a smooth and error-free performance. Different functional issues obstruct the TV viewing experience of most TV users.

Here is a list of some common issues that people tend to face:

  • 4K video streaming not supported
  • Discolored picture
  • Poor quality of sound
  • Lines on the picture
  • Pixel disturbance
  • TV contrast setting error
  • Captioning in automatically starting
  • Cable freezing
  • Squashed picture
  • Grainy display
  • Blue, green or black TV screen 

This is just a glimpse of issues that people encounter while watching the TV; still, there are many issues other than the above.

Samsung TV Issues

While watching TV, you may see lines in a horizontal view on the TV screen. And it can be more frustrating than anything. Moreover, low signal strength can be another reason for such an issue. For this fix, you need to get in touch with a Samsung TV service center Dubai. And for that purpose, you can reach us at our franchise.

No sound at all is another great thing to consider. All of a sudden, right in the middle of your favorite movie, you come to know that audio has turned off without doing anything. Changing the settings of volume does not work here; even nothing can work at this time. It is because of some internal issues or might be speakers making some disturbance.  Again, you need some expert in this situation that can assist you in the right direction.

Smart TV Offers in Dubai
Blog

Smart TV Offers in Dubai

Do you know what a Smart TV is? 

A Smart TV is also known as a connected TV (CTV), which is a typical TV set along with incorporated internet and interactive Web 2.0 features. These features let you stream music and videos of your choice. You can even browse the internet and watch photos as well.

You can call Smart TV as a technological convergence of computers, TV sets and set-top boxes. These devices, other than providing typical functions of TV sets and set-top boxes with the help of broadcasting media, can also offer internet TV, over the top content OTT, online interactive media, and on-demand streaming media. These are all the Smart TV functions provided for the users. 

Smart TV offers in Dubai are more exciting and mouth-watering. Nobody can resist availing offers in Dubai. One must not mingle internet TV, IPTV, or web television with Smart TV. Internet TV claims to have television content on the internet rather than typical systems, including cable and satellite, besides the delivery of the internet.

Do you know that in Smart TV, the operating system is loaded already? 

You can preload apps or software applications into the device, or even update or install on demand through an app store.  

Smart TV Offers in Dubai 

Do you ever think about making the right choice? 

Indeed, when you finally decide to buy a new TV, you need to pick up the one that is ideal for you and your home. When you go there, you tend to find lots of new features that you must choose between. 

Do you ever try Plasma? 

What do you think about an LCD or LED? 

Moreover, you should consider the size and price as well while buying a Smart TV. 

LED, LCD, and Plasma Contrasts 

Other than the above points, you need first to make a final decision whether you want a LED, LCD or Plasma TV. These are the three most famous and practical kinds of televisions because of their size and price.

With Repairshopdubai, you can surely make it easy for you to choose the one with more payback facility. It is said because, in most cases, when you need TV repair Dubai, we can take the stress for you. You can narrow down your research with our skillful service providers.

In comparison, LED TVs mostly have a better contrast ratio and hence provide better picture quality. The blackness of a picture’s black part can clearly tell the screen quality. With Plasma TVs, black color is commonly gray, and it is in the middle of the screen when it comes to LCDs.

TVs come at different sizes and prices. You can choose the one with more than 100 inches and can be purchased easily at a low cost in Dubai. Isn’t it one of the excellent Smart TV offers in Dubai? 

Of course, as the size increases, the price rises.

With us, you can find more than 100 brands and products. In Dubai, prices of TV range from AED 15 to AED 659-950. We have the most popular brands, including Samsung, LG, Sony, Philips, Hisense, and more. 

How to Connect HDMI from Laptop to TV
Blog

How to Connect HDMI from Laptop to TV?

Did you ever want to see your favorite movie or serial on the bigger screen of the TV instead of a Laptop? You can do it just by connecting the laptop to TV with the help of HDMI cable. Most of the people don’t know exactly how to connect the laptop to TV using HDMI cable. For this, we made an easy step by step guide for our users to follow in order to connect the laptop with TV. 

Watching something on the bigger screen of TV is entirely pleasing and exciting, indeed. You can connect the TV and laptop by using different ways. Here you will get to know everything about the most common trick of HDMI cable connection. Well, it is not difficult at all, just follow the steps given below and all set.

Step for How to Connect HDMI from Laptop to TV

Step 1:

Turn on your Laptop and TV. Power on both devices with HDMI port and find an HDMI cable.

Step 2:

Put HDMI cable into both devices’ (TV and laptop) ports.  

Step 3:

At first, you may see a blue TV screen that shows No Signal message.

From your remote, press the INPUT or SOURCE button.

Next, use the Arrow icon and select HDMI 1 on the TV screen.

Step 4:

Now, you will see the same screen on TV as your laptop.

If not, then follow some further steps to do some settings.

  1. From the laptop keyboard, you have to press the Windows key + R key at the same time to open the Run box.
  2. Next, type control in the given box and press Enter to open Control Panel.
  3. When you see Large icons, click Display.
  4. Hit Adjust resolution.
  5. From the Display drop-down list, choose TV.
  6. Now, try changing the solution to have a better view on the TV screen. Click OK to save the settings once it is completed.

What If There is No Sound from TV Speakers

Ensure that the volume is not muted and set properly on both devices, laptops, and TV.

Next, you need to set the HDMI audio output device as your default device.

  1. At the bottom right side of the laptop screen, you have to the right click on the sound icon. And click Playback devices.
  2. Click on Set Default, once highlighting the HDMI audio output device.  

If you are unable to find the HDMI audio output device, then right-click on the blank space and check on Show Disabled Devices.

Still No Sound?

After all these steps, if you are still unable to listen to sound from the speakers of TV, then you need to update the HDMI audio output device driver. From the website of manufacturers, you can directly download the advanced drivers. However, downloading drivers is another tricky thing.  

Anyhow, downloading drivers will surely help you get the sound issue resolved. Other than that, you may need to find the best for any possible defect in the device.

Repairshopdubai is the best deal in terms of your laptop and TV repairing issues.

That’s it for now. Hopefully, you will enjoy the bigger screen charm by following the steps mentioned above.  

Digital TV Tuner Device Registration Application
Blog

Digital TV Tuner Device Registration Application

Several third-party Antivirus packs have chosen the Digital TV Tuner Device Registration application program as it slows down the system. It is confirmed by all security packs including Avast, Node32, and McAfee that it is slowing down the computer. Well, this is not restricted to just a particular Windows version. Instead, it is reported to appear on Windows 7, Windows 8.1, and Windows 10.

What is Digital TV Tuner Device Registration Application?

If you have any know-how about Windows and computers, you must be having an idea of what it is exactly. Actually, it is a piece of the Windows Media Center. It is used for getting and displaying a digital signal for your PC. It also helps users to experience digital cable channels on the computer screen.

If your device is labeled with Integrated Digital Tuner, Digital Receiver or Digital Tuner, it means that your system has a TV Tuner built-in. 

So, Is the Digital TV Tuner Device Registration Application Safe?

In terms of the security dilemma, you don’t know whether you should remove the Digital TV Tuner Device Registration Application or not. 

On the other hand, when it comes to performance, you can remove the Digital TV Tuner Device Registration Application as it surely makes logic in a few situations. However, ehPrivJob.exe will not require up to 70 % of the system resources, definitely.

Do you know that Avast in combination with a few other Antiviruses is a bit confusing on this issue?

Indeed, it has the probability to slow down the system when you are keenly using the TV fine-tuning feature. Also, keep one thing in mind that ehPrivJob.exe is most of the time blamed for disturbing boot-up times rather than system performance once the startup series is completed.

Should You Remove the Digital TV Tuner Device Registration Application?

Usually, ehPrivJob.exe will not take much system resources. However, some particular situations, when the ehPrivJob executable appears as a problem and runs at a full pace even when the computer is not involved in any tuning.

The answer to the question of whether one should eliminate Digital TV Tuner Registration Application or not depends on the tasks your computer is having.

If it is being used for TV tuning intentions, then removing the Digital TV Tuner Device Registration Application is not a good plan.

How to Remove the Digital TV Tuner Device Registration Application?

If you have finally decided to remove it from the system, you need to follow the steps given below. However, keep it in mind that by doing this you are removing the ability of a computer to proceed as a TV tuner and browse your TV channels.

Still, if you are not interested in this feature, you can use the Add/Remove Programs option to stop Windows Media Center from the Windows Features list.

  1. Press Windows Key + R to open a Run dialog box. Type “appwiz.cpl” and hit the Enter button to open the Programs and Files screen.
  2. In the Programs and Features Screen, hit make Windows features on or off from the left-hand side menu.
  3. Wait for a while until the Windows media Features menu is loaded completely. Expand the drop-down menu linked with Media Features and remove both ticks linked with Windows Media Players and  Media Features.
  4. Click Yes finally.
  5. Click OK to verify the changes and wait for them to be imposed. 

Repairshopdubai is the best solution when it comes to finding Tv Repair in case of getting a way out of any problem with the device. Make sure to have a good profile dealers with you as you may need often.